Saturday, May 31, 2014

Walking To


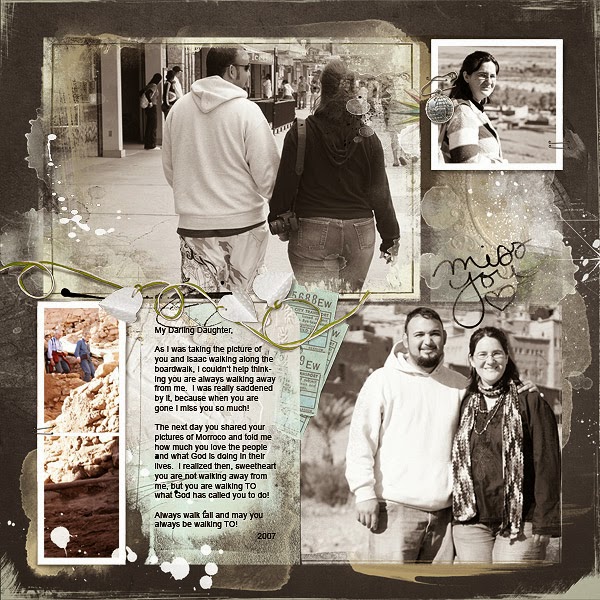
I wrote this for my daughter back in 2007, since that time they have gone to some amazing places and touched many people in their travels.  I used to dread them leaving after a visit home, but understood what God was asking of them.  This year God has brought them home and they are going in a different direction.  This mom is grateful to have her daughter closer, although there are miles between us it isn’t as daunting as having them across the world.

 
Everything by Anna Aspnes

FotoInspired Double Template No 57
http://www.oscraps.com/shop/product.php?productid=10008049&page=1
ArtPlay Across The Miles
http://www.oscraps.com/shop/product.php?productid=10008968&cat=383&page=1
Across the miles WordArt no 1
http://www.oscraps.com/shop/product.php?productid=10008943&cat=383&page=1
Find My Way Overlays4
http://www.oscraps.com/shop/product.php?productid=10008967&cat=383&page=1
FotoInspried Edge Templates No 6
http://www.oscraps.com/shop/product.php?productid=10008937&cat=383&page=1
6 X 6 ArtsyKardz Across the Miles
Coming Soon
ArtsyKardz Across the Miles
Coming Soon
Distressed Edge Overlays No 5

Process:  Placed my photos, used ArtsyKardz to fill in some of the blank areas, placed the FotoInspired Edge Template behind the photos and used the gradient map to colorized the various layers,  used the Find My Way Overlays 4 as a frame for my big photo, this draws your eyes to that photo…..added embellishments.

Monday, May 26, 2014

Remember our Military

Memorial Day - remember our military, those fallen and those still out there in harms way.....Thank you for all you do to keep our country free.

Distressed Edges
http://www.oscraps.com/shop/product.php?productid=27989&page=1

Photos from the internet.

Process:  I used the cemetery picture as my background, added the flag and enlarged it to cover my page, added a mask to it and used the gradient brush to fade out half of the image.  Added the soldier attached a mask in black mode, used soft brush to bring in the part of the soldier I wanted.  Added gradient map color to tone down the colors - create a composite sthe top layer then press your control +shift +Alt + E.  This will merge your layers on a new layer, but keep individual layers below it. - I then used the rendering spotlight filter to highlight the soldier.  I added another gradient map to tone it down and also lowered the saturation a bit.  Finished off with wordart and distressed edge.

Sunday, May 25, 2014

The Faces of Santa Cruz

Everything by Anna Aspnes

ArtPlay Shine
http://www.oscraps.com/shop/product.php?productid=10008906
Urban Stitches Sunshine 1
http://www.oscraps.com/shop/product.php?productid=10008904
SkinnyLined Overlays No.4
http://www.oscraps.com/shop/product.php?productid=10008779&page=1
AnnaBlendz No 3 Blending With Brushes
http://www.oscraps.com/shop/product.php?productid=10008857&cat=422&page=1

For those of you who struggle with brushes and just don’t know what to do with them, this video is for you.  I love how you can blend with brushes, soften edges and even use them as clipping masks.  Anna takes you through the process of using the brushes and gives you some product to work with as well…..

Saturday, May 24, 2014

Shine Bright

My Granddaughters a few years ago....

Everything by Anna Aspnes
 
ArtPlay Shine
http://www.oscraps.com/shop/product.php?productid=10008906
ArtPlay Easter Chicks
http://www.oscraps.com/shop/product.php?productid=30109&page=1
WarmGlows 7
http://www.oscraps.com/shop/product.php?productid=10008905
Urban Stitches Sunshine 1
http://www.oscraps.com/shop/product.php?productid=10008904
Different Strokes 9
http://www.oscraps.com/shop/product.php?productid=46572&page=1

Process:  Duplicated photo 2 times and changed the top photo into a sketch by using Janna Mortons instructions.   The first photo, I added a layer mask and changed it to black mode.  Control – backspace.  Then using a brush at about 20% opacity I started “erasing” some of the black so the color would come through.  When I got the color applied to my liking I added the color glow in the upper right side and used the Urban stitch of the sun.  I then added some transfers and splatters to add some texture and interest to the page.

Thursday, May 22, 2014

Quentin's 8th Birthday

My grandson Quentin, his favorite characters are the transformers, so for his birthday we got him a BumbleBee transformer.  His Gampi helped him figure out how to get the car turned into a robot, but couldn't get it turned back to the car.  Guess Quentin will be on his own for that part.  I hope he forgives me for getting him a birthday card for a nine year old.  He was a good sport about it....


Everything by Anna Aspnes

Artsy Layered Template 143
http://www.oscraps.com/shop/product.php?productid=10008553&page=1
FotoInspired Double Template 61A
http://www.oscraps.com/shop/product.php?productid=10008488&page=1
ArtPlay Escape
http://www.oscraps.com/shop/product.php?productid=10008781&page=1
ArtsyKardz Escape
http://www.oscraps.com/shop/product.php?productid=10008829&cat=383&page=1
SkinnyLined Overlays 4
http://www.oscraps.com/shop/product.php?productid=10008779&cat=383&page=1
Escape Wordart 1
http://www.oscraps.com/shop/product.php?productid=10008759&cat=383&page=1
LoopDaLoop ArtStrokes 5
http://www.oscraps.com/shop/product.php?productid=27872&page=1

Process:  Create document size 7200 X 3600, copied and placed Artsy Layered Template 143 on the left, copied FotoInspired Template 61A and placed it on the right side.  Since my grandson loves the transformers I used a picture of Bumblebee from the web as the background for my artsy template side.  I used Judy’s tutorial on Anna’s blog to repeat the image in the various layers….used additional transfers, brushes and blending modes.  Added picture of grandson and journaling.  For the right side I placed the pictures and used transfers to blend into various areas to add texture and interest.  The number 8 was made with text and adding a white stroke around it.

Sunday, May 11, 2014

Coryann 5-8-14


Our newest granddaughter Corynn

ArtsyKardz Cherish MultiPack A
http://www.oscraps.com/shop/product.php?productid=10008638

Saturday, May 10, 2014

Adele


I love working with text - I took Adele's song "Set Fire to the Rain", I can listen to this all day long. 

Anna Products used:

ArtPlay Cherish
Currently unavailable
ArtPlay Generations
http://www.oscraps.com/shop/product.php?productid=10008711&cat=383&page=1

Process: Tutorial Coming Soon

Wednesday, May 7, 2014

Turning 4


Everything by Anna Aspnes

ArtPlay Cultivate
http://www.oscraps.com/shop/product.php?productid=10008557&page=1
ArtsyKardz Cultivate 4X6
http://www.oscraps.com/shop/product.php?productid=10008624&cat=383&page=1
Painted Numbers 1
http://www.oscraps.com/shop/product.php?productid=29744&page=1
Watercolor Flowers 1
http://www.oscraps.com/shop/product.php?productid=10008554&cat=383&page=1

Process:  choose my photo and selected the background I thought would fit perfectly with it.  I added my photo and moved it around to where I wanted to place it, used one of the transfers as a clipping mask.  Since I wanted to say something about her being four I added Anna’s Painted Numbers, filled with a color.  It needed some depth so I duplicated the layer and filled with a darker color.  I masked out (erased) some of the dark areas leaving only some of the edges dark.  I duplicated the layer again and erased (masked) out all the numbers but the four, filled it with some of the transfers to get soft color on it.  I then added under the clipping mask of the photo a soft watercolor flower to extend the flower on Sydney’s shirt.  It still needed some stuff so I added under the background area a blending mask as well as a solid color paper.  Clipping the top paper to the blending mask, this added some grunge to it.  Finishing it off I added bits and pieces from the ArtsyKardz and the word “turning” on the number 4.  I think I can call it done ;>)