1.
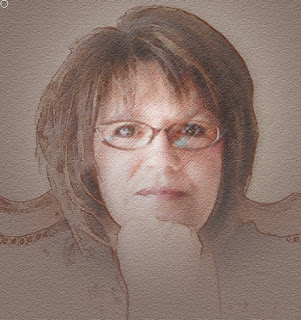
Choose the photo you want to work with. For this tutorial I choose the photo I used
for my avatar. Start by duplicating the photo twice by pressing Ctrl-J two
times.


2.
With the top layer (Layer 1 copy) active in the
layers panel, go to Filter>Blur>Smart Blur. We’re not really creating a blur here but
rather creating the line-drawing effect.
Go to the Mode drop down menu at the bottom of the Smart Blur dialog and
choose Edge Only. Set the Quality
drop-down menu to High. Then, move the
Radius and Threshold sliders to refine how much line detail you want. For this photo I set the Radius to 2.5 and
the Threshold to 25. Click OK

Note: What
you want to achieve is the amount of outline you want, you can go more by
decreasing the Threshold and Increasing the Radius. Just play around with it until you get the
look you want.

3. Now we need to extract the line drawing from the
layer so we can change the line color.
Go to the Channels panel (Window>Channels), hold down the Ctrl key,
and click on the RGB channel thumbnail.
This will load the luminosity of the image as a selection. Since the image is black and white, it will
ignore black and load just the white area.


- Photoshop Element users don’t have The Channels function so replace step 3 with these instructions.
-
Layer1 copy
Ctrl I to inverse (you should have a white background with black outlines. Go to
Select>Color Range
-
Select:
Highlights
-
Selection
Preview: White Matte
-
Click okay
- You should have the marching ants on the line work, click on the delete button and you white background should be removed.
4.
With the selection active, go back to the layer
panel and click the Create a New Layer icon at the bottom of the Layers panel
to create a new blank layer (Layer2). Click
the Eye icon to the left of the original line drawing layer (Layer 1 copy) to
hide it. Then press Shift –Backspace to
bring up the Fill Dialog. Choose Black
from the Use drop-down menu, and click OK. Press Ctrl-D to deselect. The line-drawing effect over the original
photo creates an interesting result.


5.
Click on the original Background in the Layers
panel to make it active. And go to Filter>Blur>Average. It will look at the overall image and
generate a color fill based on the average color tone of the entire image. Usually the result will look good, but
experiment with other colors to what works best for your image.


6.
Activate the duplicate layer (Layer 1) that
still contains the original image. Hold
down the Alt key and click the Add Layer Mask icon (circle in a square) at the
bottom of the Layers panel. This will
create a layer mask filled with black, hiding the entire layer.

7.
Select the Gradient tool (G). Press D to set the Foreground color to white. Click the down-facing arrow next to the
gradient preview in the Options Bar to open the Gradient Picker and choose the
Foreground to Transparent gradient. To the right of the gradient preview in the
Options Bar, choose the Radial Gradient icon.

8.
Click to start the gradient in the area of the
image where the main subject is, then drag toward the bottom of the image. (I started my selection at the now base of my
glasses and ended just below my hand.) This will reveal the image in the where
you started dragging and fade away the edges to reveal a portion of the
original photo.


9.
Since we want the image to transition from a
photo to a line drawing, we need to mask the line drawing area in the
middle. Select the layer containing the
line drawing (Layer 2) and click the Add Layer Mask icon again (but this time
without holding down Alt). This will add
a layer mask filled with white, revealing the entire layer.
Press X until the Foreground color
is set to black. Using the Gradient tool
again, draw the gradient in the same area and distance as you did in the
previous step. Now as the photo fades
out, the line drawing fades in.
10.
Let’s slightly change the color of the
outline. Click the layer thumbnail for
the line drawing layer (Layer 2) to make the layer active and not the
mask. Click the Lock Transparent Pixels
icon (checkerboard) at the top of the Layers panel. Click the foreground color swatch at the
bottom of the toolbox, select a color in the Color Picker (I went with a brown
shade) and click OK. Press Alt-Backspace
to fill the lines with your chosen color.
To finish the effect, I added some
texture to the background color.
Activate the Background layer and go to Filter>Filter Gallery>Texturizer. Set the Texture drop-down menu to Sandstone,
Scaling to 149, Relief to 6, and click OK.


Click on layer one photo (not the
mask), go to Filter>Filter Gallery>Texturizer keep the same settings as
you had with background texture click okay, go back into Filter Gallery to add
some additional texture, this time instead of Texturizer in the drop down,
choose Rough Pastel. For this photo I
used Stroke Length 28, Stroke Detail 20, Texture Canvas, Scaling 76, Relief
12. Again each photo may use different
settings, just play around with them until you get the desired results.
11.
For the final step – do some clean-up on the
line work. Go to Layer 2, click on the mask, using a soft brush start cleaning
up some of the more erratic lines to make it more realistic, or use your
gradient tool once again to fade out certain areas. For this photo I wanted to fade the bottom
portion a bit more, so I started the gradient from the bottom of the photo and
went upward.


You can also turn off the line layer and get
a soft portrait effect. Have fun with
this and try out different filters. Make
this your own.


No comments:
Post a Comment